You are here:
Home > Help & Information >
openBVE Help & Information >Windows (Page 3)
▪ openBVE Help and Information
This section of the site is designed to help you get started with the realistic
openBVE train simulator in Windows (XP, Vista, 7) and Ubuntu 10.10, as well as guide
you through the installation and first use of the
Birmingham Cross-City South route to enable you to start driving. Some parts
of this guide are geared towards novice users.
▪ Contents
Windows Users: [Click
here to select a different operating system]
Page 1:
Page 2:
Page 3: (Current Page)
▪ Display quality - Anti-aliasing and Anisotropic Filtering
This part of the openBVE Help Guide explains
how to use two display enhancement methods used on 3D graphics cards which increase
the quality of the visuals you see in 3D games, namely 'Anti-aliasing' and 'Anisotropic
Filtering'. This guide assumes that you are using a graphics card in either the
NVIDIA GeForce or ATI Radeon product ranges, both of which include popular 3D hardware
accelerators generally designed for more serious gaming performance on the PC. If
you are using another type of graphics card, please consult your user guide or instruction
manual for details on how to adjust it's equivalent display driver properties -
not all graphics cards and drivers will enable you to alter such advanced settings
however.
Anti-aliasing is a technique
for smoothing out the jagged edges of lines or hard edges in a 3D view, often referred
to as 'jaggies', and most noticeable in lower display resolutions. Enabling anti-aliasing
means that such details as overhead wires or the edges of buildings are rendered
in a smooth way, without any unsightly stepping effects or jagged edges to be seen.
Anisotropic filtering is a
technique for reducing or removing the shimmering and 'swimming pixel' effects on
textures visible in the distance, when viewed from a low angle - for example distant
terrain or track textures as they get further away. Enabling anisotropic filtering
significantly enhances the appearance of the graphics.
▪ Setting Anti-aliasing and Anisotropic Filtering Options - NVIDIA Users
If you use an NVIDIA GeForce graphics card, then you should be using the ForceWare
drivers which are NVIDIA's driver set for all cards in the GeForce range.
Note: One thing you should check is whether you are using NVIDIA's
drivers, or the default drivers included with Windows - the default drivers do not
allow you to adjust advanced graphics card properties like anti-aliasing or anisotropic
filtering, and may also reduce your framerates and performance. If upon following
these instructions, you can't find a way to display the NVIDIA Control Panel, you
should download and install the latest ForceWare drivers from the
NVIDIA website if you want to use the advanced driver features explained
on this page.
Important: Don't install new drivers
on your system unless are sure you know what you are doing. Please ensure that you
can undo any changes you make to your graphics card drivers before installing new
drivers - see the Windows Help and Support Centre for details about the 'System
Restore' feature, which can roll back to the previously installed display driver
should any problems occur.
The following screenshots show the NVIDIA ForceWare 191.07 drivers.
Setting the Anti-aliasing and Anisotropic
Filtering levels
- First, right-click your desktop and select
NVIDIA Control Panel:

- The NVIDIA Control Panel appears; if you haven't already done so, select the
Advanced view:
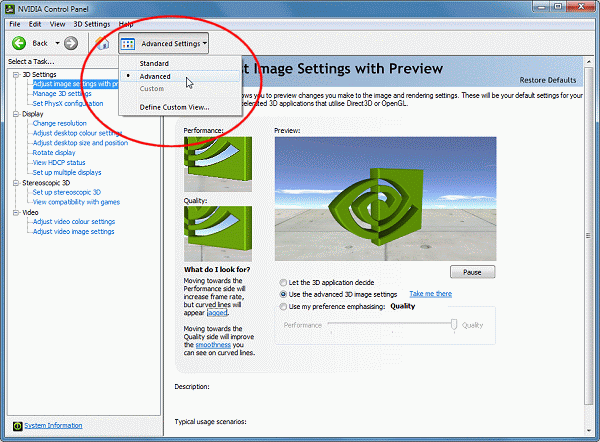
- Now, click the 'Manage 3D Settings'
icon:

- The 'Manage 3D Settings' section
is displayed:

In the 'Global Settings' tab,
click 'Anisotropic Filtering',
and then select '16x', or whatever
maximum setting is offered. Next, click 'Antialiasing
- Mode', and select 'Override
any application setting'. Then, click 'Antialiasing
- Setting', and then select '16xQ'
(or whatever highest setting is available). Now, click the
'Apply' button.
The more powerful your GeForce graphics card, the higher these settings can
be without the performance penalty being too great - you may wish to experiment
with the settings once you've seen how openBVE runs with the selected level of antialiasing
and anisotropic filtering.
▪ Setting Anti-aliasing and Anisotropic Filtering Options - ATI Users
If you use an ATI Radeon graphics card, then you're probably using the Catalyst
drivers which are ATI's driver set for all cards in the Radeon range. This part
of the guide explains changing the settings using the
Catalyst Control Centre software.
Note: One thing you should check is whether
you are using ATI's drivers, or the default drivers included with Windows - the
default drivers do not allow you to adjust advanced graphics card properties like
anti-aliasing or anisotropic filtering, and may also reduce your framerates and
performance. If upon following these instructions, you can't find a way to display
the Catalyst Control Centre, you should download and install the latest Catalyst
drivers from the
AMD/ATI website
if you want to use the advanced driver features explained on this page.
Important: Don't install new drivers
on your system unless are sure you know what you are doing. Please ensure that you
can undo any changes you make to your graphics card drivers before installing new
drivers - see the Windows Help and Support Centre for details about the 'System
Restore' feature, which can roll back to the previously installed display driver
should any problems occur.
Setting the Anti-aliasing and Anisotropic
Filtering levels
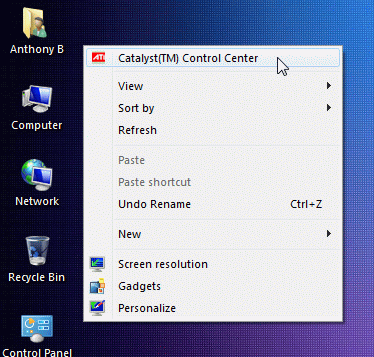
- First, right-click your desktop and click 'Catalyst(TM)
Control Centre':
- Next, open the 'Graphics'
menu, and click '3D':

- Next, click the 'All' button
near the top of the form:

Now, under 'SMOOTHVISION HD:Anti-Aliasing',
un-tick the 'Use application settings' checkbox,
and drag the 'Level' slider to one of the available multipliers
(personally I use 8x anti-aliasing, the maximum). The more powerful your Radeon
graphics card, the higher this setting can be without the performance penalty being
too great - you may wish to experiment with the settings once you've seen how your
games run with the selected level of anti-aliasing.
Now, under 'SMOOTHVISION HD:Anisotropic Filtering',
again un-tick the 'Use application settings' checkbox,
and drag the 'Per-pixel samples:'
slider to one of the available
multipliers (personally, I set it to 16x anisotropic filtering, again the maximum).
The more powerful your Radeon graphics card, the higher this setting can be without
the performance penalty being too great - again, you may wish to experiment with
the settings once you've seen how your games run with the selected level of anisotropy.
Now click the 'OK' button.
The anti-aliasing and anisotropic filtering levels are now set, and you can start
openBVE and see if the quality of your graphics has improved! If there is any performance
degradation and you find it unacceptable, repeat the above steps and select lower
levels of anti-aliasing and anisotropic filtering, and then try openBVE again.
Content last updated: 25th December 2010

