You are here:
Home > Help & Information >
openBVE Help & Information >Windows (Page 1)
▪ openBVE Help and Information
This section of the site is designed to help you get started with the realistic
openBVE train simulator in Windows (XP, Vista, 7) and Ubuntu 10.10, as well as guide
you through the installation and first use of the
Birmingham Cross-City South route to enable you to start driving. Some parts
of this guide are geared towards novice users.
▪ Contents
Windows Users: [Click
here to select a different operating system]
Page 1: (Current Page)
Page 2:
Page 3:
▪ Preparing folders for your openBVE installation and add-ons
The first step is deciding where you want
openBVE
and
openBVE content (i.e., routes and trains)
to be stored. openBVE itself can be installed in any folder of your choosing, and
so can routes and trains,
but within the folder where
your content is stored, a particular directory tree must be created and/or preserved:
Note: The folder
"openBVE Content" can be named anything you like, but the
Railway,
Object,
Route,
Sound and
Train folders, must be named
exactly as they are shown above. For example,
Object must be Object,
not Objects, etc...
Installing the Cross-City South later on in this guide, will create the Object,
Route and Sound folders for you, so if you follow this guide, you shouldn't need
to worry about this.
For absolute beginners, I recommend you follow these steps:
Creating the openBVE folder (directory)
- Open Windows Explorer, either via Start Menu > Accessories > Windows
Explorer, or by opening (My) Computer on your Desktop.
- Locate a hard disk (or partition) where you would like to have
your copy of openBVE or your add-ons stored. It doesn't matter which you choose,
or what parent folder you'd like to create your new folders in, as long as there
is sufficient free space (say, 200MB for a couple of detailed routes).
Note: I'd recommend that Windows
7 (and Vista) users
avoid creating openBVE directories within the
"Program Files" folder, unless User Account Control
is set to "Never Notify", or UAC is otherwise turned off.
- Right click in an open space within the Explorer window, select New >
Folder. Now name this folder 'openBVE' and hit Enter:


If you already use BVE Trainsim,
then you'll already have routes and trains installed (likely in your
'<System Drive>:\Program Files\mackoy\BVE4\' folder), in which
case you may want to simply install new openBVE or BVE Trainsim add-ons in the same
place as your existing BVE Trainsim add-ons. In this case, you can proceed to "Handling
archive files" below.
If however, you're
wanting to install content designed only for openBVE
(or you don't use or wish to use BVE Trainsim), then I recommend creating a new
folder for storing this content, so you don't end up accidentally trying to load
openBVE content in BVE Trainsim, which may not always be fully compatible with it.
In this case:
Creating the folder for your add-ons
- Create another new folder, named 'openBVE Content' (but you can
give it any name you want).
- Now double click the 'openBVE Content' folder,
and inside it, create a new folder named 'Railway'.
- Now create a second folder within your 'openBVE Content' folder, named 'Train'
(note: don't pluralise the name).
You should now have a folder structure like the following (referring to the folders
contained within the red box):

You can of course move the 'openBVE' and 'openBVE Content' folders anywhere
you like; you just need to ensure that the folder structure
within
both of these folders remains intact.
Reminder: I'd recommend that
Windows 7 (and Vista) users
avoid creating openBVE directories within the
"Program Files" folder, unless
User Account Control is set to "Never Notify", or UAC is otherwise turned off.
▪ Working with archive files
openBVE is a cross-platform simulator, distributed in a compressed archive, and
so are true openBVE add-ons, in formats such as
.zip or
.7z. Before you start downloading openBVE itself or openBVE content,
I'd recommend you first download and install the
7-Zip
File Manager.
The rest of this guide assumes
that you've installed this program. If you've already installed
a program like WinZip or WinRAR, you probably don't need to read a fair part of
this guide anyway!
So firstly, you need to download the 7-Zip File Manager, by visiting the 7-Zip homepage
(
http://www.7-zip.org). You'll see something
similar to that depicted in the screenshot below. This guide assumes that you're
using Windows, so download the appropriate installer as follows (download the .exe
version if in doubt):
Now run the installer you've downloaded, and follow any on-screen
instructions.
▪ Downloading and extracting openBVE

The
openBVE homepage includes simple, step-by-step instructions to guide you through the downloading and installation of the program, as well as the required dependencies, all of which are easily available from the same page. Visit the 'Play' section of the openBVE site, and first, follow the steps in the
"Installing openBVE on Windows" page, in the
"How to install" section:
If you were able to install openBVE successfully, then you probably don't need to read the rest of this guide. :-) However, if you're not sure what to do, or something isn't working for you, please read on...
_______
You should have downloaded a total of
four files:
- openbve_stable.zip
- tao.zip
- SDL-1.2.14-win32.zip
- oalinst.zip
By now, you'll have
gone through the installation instructions outlined on the
official openBVE website; but if you became lost when it came to taking
the
'openbve_stable.zip' file
you downloaded, and extracting it's contents, read through the following steps.
These instructions assume that you successfully installed the 7-Zip File Manager
as explained above.
Extracting the program to your openBVE
folder
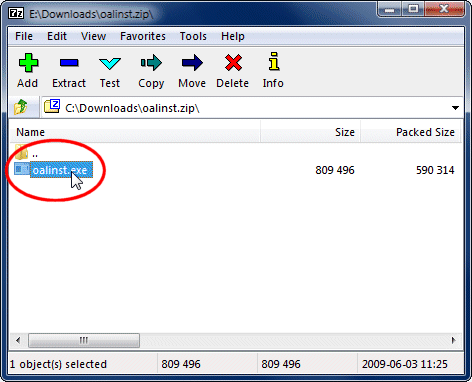
- Locate the 'openbve_stable.zip'
file you downloaded, right-click it's icon,
open the '7-Zip' submenu, and click
'Open archive':

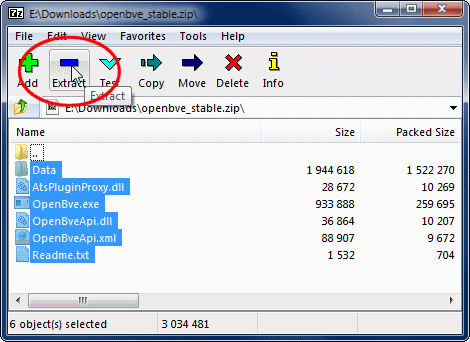
- Now, ensure that ALL the contents
of the archive are selected by dragging a selection box around them, and
then click the Extract button:
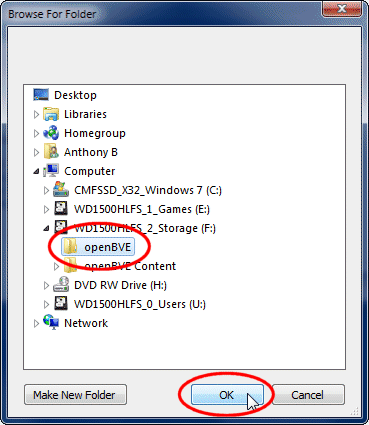
- Click the browse for folder button on the right (labelled '...'):
- Locate the 'openBVE' folder
you created earlier, click on it, and then click 'OK':
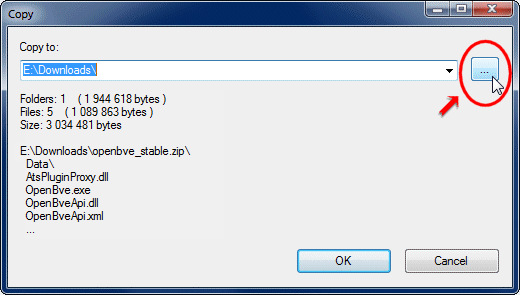
- Now verify that the correct folder is listed in the 'Copy to:' box (your drive letter
may differ, that's fine), and click 'OK':

Note: You may be prompted to overwrite files if you've installed
openBVE previously; if so, just click "Yes to All" to extract the contents of the
archive.
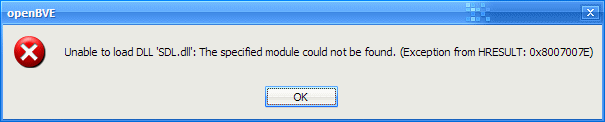
- If you encounter the following diagnostic messages, then these problems may be caused
by the User Account Control feature of Windows 7 or Vista, preventing you from extracting
files to a location within a protected operating system folder, likely the "Program
Files" folder:

To resolve this, you can either relocate your openBVE folder to somewhere other than the "Program
Files" folder (recommended), or set User Account Control to "Never Notify" (only
advanced users should consider this). Within Windows' Help and Support, search for
"UAC", for more information about the latter option.
Next, we need to install some dependencies which openBVE requires. This is really very easy:
Installing Tao Framework libraries
- Locate the 'tao.zip'
file you downloaded, right-click it's icon,
open the '7-Zip' submenu, and click
'Open archive':
- Now, ensure that ALL the contents
of the archive are selected by dragging a selection box around them, and
then click the Extract button:

- Click the browse for folder button on the right (labelled '...'):
- Locate the 'openBVE' folder
you created earlier, click on it, and then click 'OK':

Installing the SDL library
- Locate the 'SDL-1.2.14-win32.zip'
file you downloaded, right-click it's icon,
open the '7-Zip' submenu, and click
'Open archive':
- Now, ensure that ALL the contents
of the archive are selected by dragging a selection box around them, and
then click the Extract button:

- Click the browse for folder button on the right (labelled '...'):
- Locate the 'openBVE' folder
you created earlier (just as with the previous archives), click on it, and then click 'OK'.
Now, if you want, you can
create a desktop shortcut to openBVE, for later use:
Creating an openBVE desktop shortcut
- Right-click your desktop, select New > Shortcut, click
Browse, navigate to the folder you extracted openBVE to
(if you followed my example, "<Your_Drive>:\openBVE\"),
select "OpenBve.exe", and then click OK. You should
then see the something like the following:

Now you can just click 'Next >' and complete the Wizard.
IMPORTANT NOTE: Please ensure that you've been through
ALL the previous steps before attempting to run openBVE!
Failure to follow the above steps, may result in an error like the following when you try to run openBVE:
Windows 7 / Vista:
 Windows XP:
 If an error similar to these appears, please read and follow the above instructions again, carefully.
▪ Installing OpenGL graphics drivers
To get good framerates with openBVE, as with any other 3D game,
you need hardware 3D acceleration. openBVE uses OpenGL (along
with popular games like Doom 3 or Unreal Tournament, simulations like X-Plane, or
applications like Google Earth), therefore you need to
ensure that your graphics card drivers include OpenGL support. If you
see very poor performance while running openBVE, perhaps the game's 3D output is
being rendered via software emulation rather than being accelerated via the hardware -
maybe because you're still using the graphics card drivers
which were bundled with Windows rather than the fully fledged drivers from the manufacturer's
website.
In this case, you may need to update your graphics card driver.
To do this, you need to know who manufactured the graphics processing unit (GPU)
on your graphics hardware; typically this will be either NVIDIA or AMD/ATI as these
are the two major players in the 3D gaming market, but you may instead have a graphics
solution from Intel, or others.
To find out whose website you need to go to in order to find suitable graphics drivers,
follow these steps:
Finding out what graphics drivers you
need
Windows 7 / Vista Users:
- Click the Start button, and immediately type "device manager"
(without the quotes); you'll see something similar to the following appear
in the Start Menu as you type. Click "Device Manager":

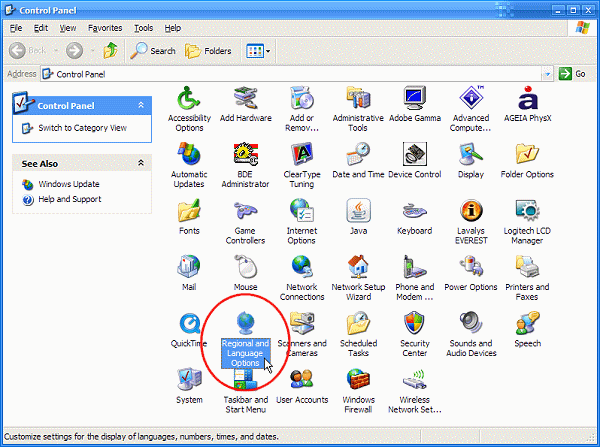
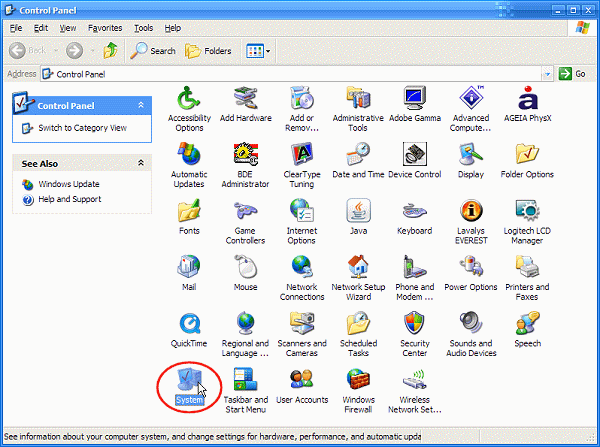
Windows XP Users:
- Go to Start Menu > Control Panel, and double-click the
System icon:
- Select the Hardware tab, and click the Device Manager
button:

- When the Device Manager is visible, expand the 'Display adapters'
node, and see what is listed there. This should tell you the manufacturer of your
graphics chip (in this example, NVIDIA):

If you're using Windows Vista or 7, and you see the letters "WDDM", or the
name "Microsoft", listed after the graphics card name, then you're probably
using default drivers which shipped with Windows. These almost
certainly won't give you the best performance, in which case you should obtain drivers
from the manufacturer of your graphics card instead...
- So, if you have an AMD/ATI graphics card installed in your machine,
please visit http://ati.amd.com/support/driver.html
and select the appropriate options to get the right Catalyst driver for your card.
Download and install the Catalyst driver suite when presented with the option, and
follow all on-screen instructions during installation. The AMD/ATI
driver download selection page (remember to select options suitable for your own
computer and operating system):
- If you have an NVIDIA graphics card installed in your computer,
please visit http://www.nvidia.co.uk/Download/index.aspx?lang=en-uk
(you can choose a different country on the page), and select the appropriate options
to find a suitable ForceWare driver for your card. Follow all on-screen instructions
once you've downloaded and executed the driver installer. The NVIDIA
driver selection page is as follows (don't forget to make selections appropriate
for your own computer and operating system):
- If your computer has a graphics solution from Intel, you can go
here: http://support.intel.com/support/index.htm
Once you've installed your new graphics card driver
and rebooted your computer,
try openBVE again - hopefully you'll now have faster and smoother framerates, as
full OpenGL support is hopefully now provided. Help with setting anti-aliasing and
anisotropic filtering options is provided on
page 3.
Note: If you see the following rare error after loading a route...

...then this may indicate that you have a problem with your graphics card drivers, possibly
when recent drivers are used with an old graphics card. I personally have experienced this
issue in Windows XP by using ATI's Catalyst 10.2 driver with an old Radeon 9600XT graphics
card, even though this is the most recent driver which supports this model.
For more advanced users:
Installing an older Catalyst driver
(version 8.5) fixed this problem for me, so you could try installing an earlier version of
your graphics card driver, to see if this resolves the problem for you, as well. Both
NVIDIA and ATI offer older versions of their drivers for download; for NVIDIA, see
here, and for ATI, see
here
(old drivers for Windows XP users). You should first remove current NVIDIA or ATI drivers
using 'Add or Remove Programs' in Windows XP's Control Panel, and then immediately
afterwards, use can if you wish, use
Driver Sweeper
to ensure that no remnants of the drivers remain,
before installing
another version of the graphics driver.
▪ Installing East Asian Language Support and Unicode Fonts (optional, but recommended)
[Windows XP users ONLY]
openBVE's interface makes use of some characters found in Unicode fonts, such as
the
arrow symbols used in the in-game menu. If you don't have East
Asian Language Support installed, then these arrows may appear as rectangles instead:
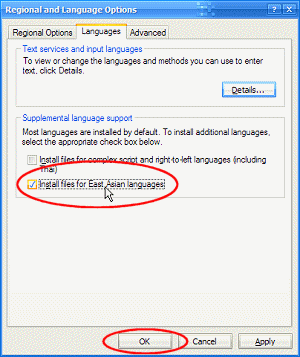
If this bothers you, or you use BVE add-ons from Japan, China or Korea, then I recommend
you
install East Asian Language Support
as follows:
openBVE is now ready! But before you launch it, we also need a route and train
to drive...
Content last updated: 12th May 2012